
(I'm not quite sure where a How To goes since the sub-forum is locked, so I figured I'd put it here. If anything is incorrect here let me know and I'll change it. This is based on talking to the service people at my dealer and my experience today)
This post is for SG Foresters, but likely will apply to other models as well. If anyone can confirm it would be great. The kit is for all Subaru's but the directions/pictures are specific to my SG
My car has developed somewhat of a musty smell coming from my air conditioning vents over the last few months. My brother had told me that a dealer down in LA had done some kind of cleaning for him at a cost of around $90.
Well today at the dealer I saw the A/C cleaning stuff at the parts department and figured I'd pick some up. It is super-easy to do.
Our local club pricing on the cleaning kit was $14.36, and the list price shows as $17.95
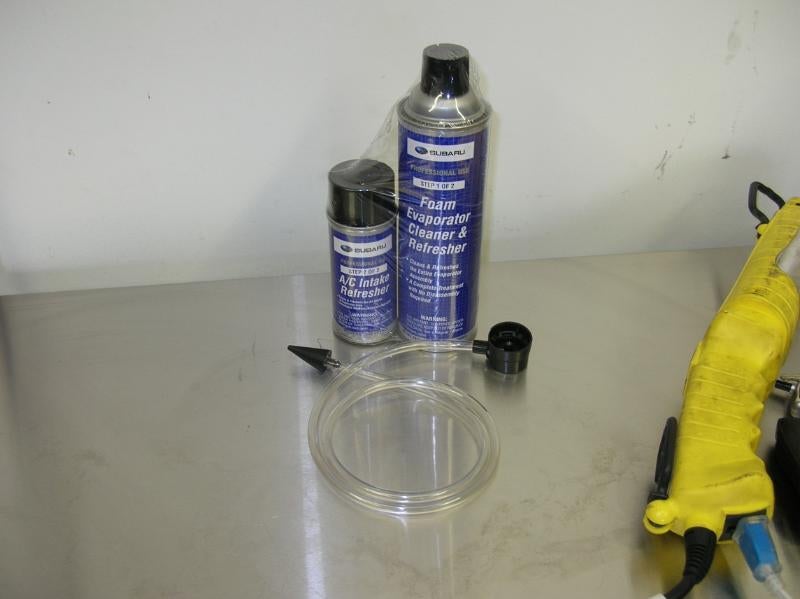
The part number for the kit is SOA868V9315. The kit comes with two aerosol cans and a piece of tubing.
![Image]()
One can is a kind of foaming cleanser for the evaporator, the other is an aerosol cleaner for the intake and venting system.
The instructions are pretty simple.
-Firstly it's recommended that you remove your cabin air filter. I suppose you could do it without, but it would kinda nasty. The can's don't say anything about removing it, but I sure would. Also you want to put all of the windows down.
To remove the cabin air filter (if you have one) you remove the glove box, pop off the filter cover, and pull the filter out. If you need to replace the filter, this project kills two birds with one stone. For more detailed instructions see Peatys thread over on ScoobyMods
http://www.scoobymods.com/cabin_air_filter_kit-t2109.html
Make sure after removing the filter you put the filter cover back on! If you don't air will not be pulled through the fresh air intake and the second step will not work.
-There is no need to put the car on any kind of lift like the can says since we can access the evaporator drain tube from under the hood and you can get a drain pan under the car without a problem.
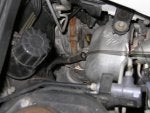
-The drain tube is located on the passenger side of the firewall. This is just behind the turbo on XT models. It is held against the firewall by a little clip, but slides out without a problem. Remove the hose from the clip so you can get to the end and plug the end with the wedge shaped end of the hose that came with the kit.
![Image]()
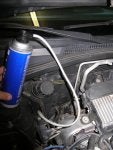
-Now hook the tube up to the larger canister and spray the whole contents into the tube. This will take a couple of minutes
![Image]()
-Once the can is empty, make sure you have a drain pan of some sort under the drain tube location. Remove the wedge plug and let everything drain for about ten minutes.
Now for the second part, the "A/C Intake Refresher."
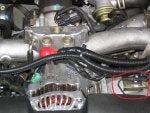
-First you need to disable the A/C compressor. To do this just unplug the one wire that is on the top of the compressor (This controls the compressors clutch). The compressor is located just to the right of the alternator if you are standing at the front of the car looking into the engine bay.
![Image]()
-Next you want to start the engine. Make sure that the air recirculation setting is OFF. Turn on the A/C mode, set the A/C vent directional control to the "body" setting, (this means the vents on the dash only) the temperature setting as cold as it will go, and set the fan speed to high.
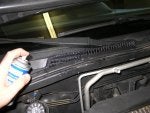
-Now spray 1/2 of the contents of the can into the fresh air intake which is located just below the wipers on the passenger side of the car.
![Image]()
-Next switch the directional control to the "Foot" position and spray 1/2 of the remaining contents of the can into the fresh air intake.
-Finally switch the directional control to the "Defrost" position and spray the rest of the can into the fresh air intake.
-Once this is all done, the directions say to continue ventilating the vehicle and running the fan with the windows down to get rid of the vapors. I let the fan run for about 20 minutes after I was done.
Now you can put the cabin air filter back in or install the new one. Put the glove box back in, reconnect the A/C Compressor clutch wire, clip the evaporator drain tube back onto the firewall, and you're good to go.
The vapor smell stayed around for a few hours in my car but has pretty much disappeared now. The musty smell disappeared immediately, and hopefully that remains the case for a long while.
This post is for SG Foresters, but likely will apply to other models as well. If anyone can confirm it would be great. The kit is for all Subaru's but the directions/pictures are specific to my SG
My car has developed somewhat of a musty smell coming from my air conditioning vents over the last few months. My brother had told me that a dealer down in LA had done some kind of cleaning for him at a cost of around $90.
Well today at the dealer I saw the A/C cleaning stuff at the parts department and figured I'd pick some up. It is super-easy to do.
Our local club pricing on the cleaning kit was $14.36, and the list price shows as $17.95
The part number for the kit is SOA868V9315. The kit comes with two aerosol cans and a piece of tubing.
One can is a kind of foaming cleanser for the evaporator, the other is an aerosol cleaner for the intake and venting system.
The instructions are pretty simple.
-Firstly it's recommended that you remove your cabin air filter. I suppose you could do it without, but it would kinda nasty. The can's don't say anything about removing it, but I sure would. Also you want to put all of the windows down.
To remove the cabin air filter (if you have one) you remove the glove box, pop off the filter cover, and pull the filter out. If you need to replace the filter, this project kills two birds with one stone. For more detailed instructions see Peatys thread over on ScoobyMods
http://www.scoobymods.com/cabin_air_filter_kit-t2109.html
Make sure after removing the filter you put the filter cover back on! If you don't air will not be pulled through the fresh air intake and the second step will not work.
-There is no need to put the car on any kind of lift like the can says since we can access the evaporator drain tube from under the hood and you can get a drain pan under the car without a problem.
-The drain tube is located on the passenger side of the firewall. This is just behind the turbo on XT models. It is held against the firewall by a little clip, but slides out without a problem. Remove the hose from the clip so you can get to the end and plug the end with the wedge shaped end of the hose that came with the kit.

-Now hook the tube up to the larger canister and spray the whole contents into the tube. This will take a couple of minutes

-Once the can is empty, make sure you have a drain pan of some sort under the drain tube location. Remove the wedge plug and let everything drain for about ten minutes.
Now for the second part, the "A/C Intake Refresher."
-First you need to disable the A/C compressor. To do this just unplug the one wire that is on the top of the compressor (This controls the compressors clutch). The compressor is located just to the right of the alternator if you are standing at the front of the car looking into the engine bay.

-Next you want to start the engine. Make sure that the air recirculation setting is OFF. Turn on the A/C mode, set the A/C vent directional control to the "body" setting, (this means the vents on the dash only) the temperature setting as cold as it will go, and set the fan speed to high.
-Now spray 1/2 of the contents of the can into the fresh air intake which is located just below the wipers on the passenger side of the car.

-Next switch the directional control to the "Foot" position and spray 1/2 of the remaining contents of the can into the fresh air intake.
-Finally switch the directional control to the "Defrost" position and spray the rest of the can into the fresh air intake.
-Once this is all done, the directions say to continue ventilating the vehicle and running the fan with the windows down to get rid of the vapors. I let the fan run for about 20 minutes after I was done.
Now you can put the cabin air filter back in or install the new one. Put the glove box back in, reconnect the A/C Compressor clutch wire, clip the evaporator drain tube back onto the firewall, and you're good to go.
The vapor smell stayed around for a few hours in my car but has pretty much disappeared now. The musty smell disappeared immediately, and hopefully that remains the case for a long while.