
Nexus 7 Android Tablet into SG9 OEM Dash Pod
Here is a how to write up for the Nexus 7 that I modded into the dash top pod of my SG9 Forester.
While I was doing this mod to my car, I found very little documentation and since installing the tablet I have had quite a few people ask me how I did it.
I have been running this in my car for around 5 months now with no real issues (the only possible problem is that it can turn itself off if you park the car in direct sunlight on +35c days, I solved this issue by getting a sun shade - a good idea anyway if you are parking your car in the sun).
This mod may differ slightly for USDM models.
IF YOU DO THIS MOD, IT IS AT YOUR OWN RISK I DO NOT HOLD RESPONSIBILITY FOR ANY DAMAGE DONE TO YOUR CAR OR YOURSELF AS A RESULT OF FOLLOWING THIS DIY
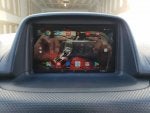
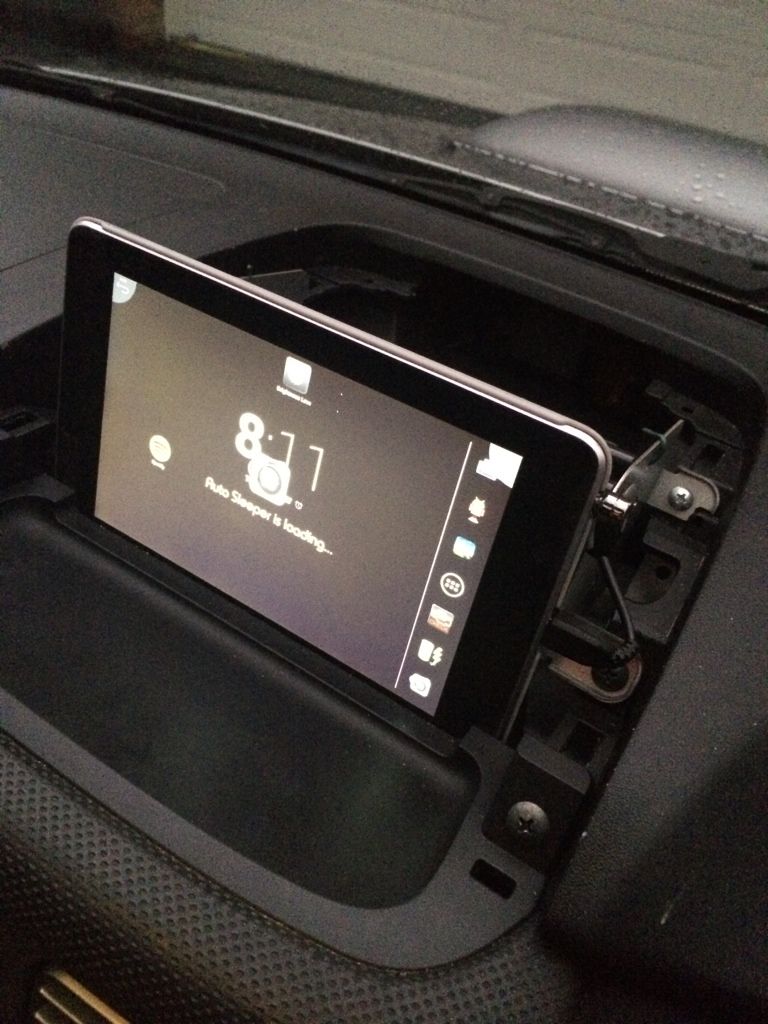
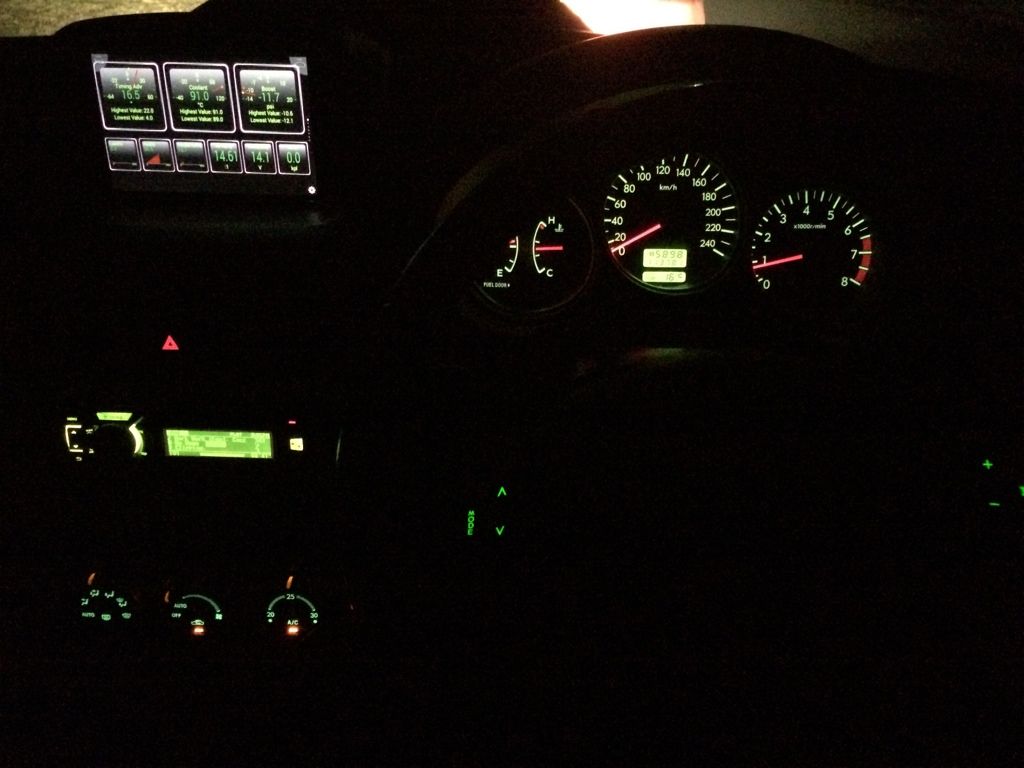
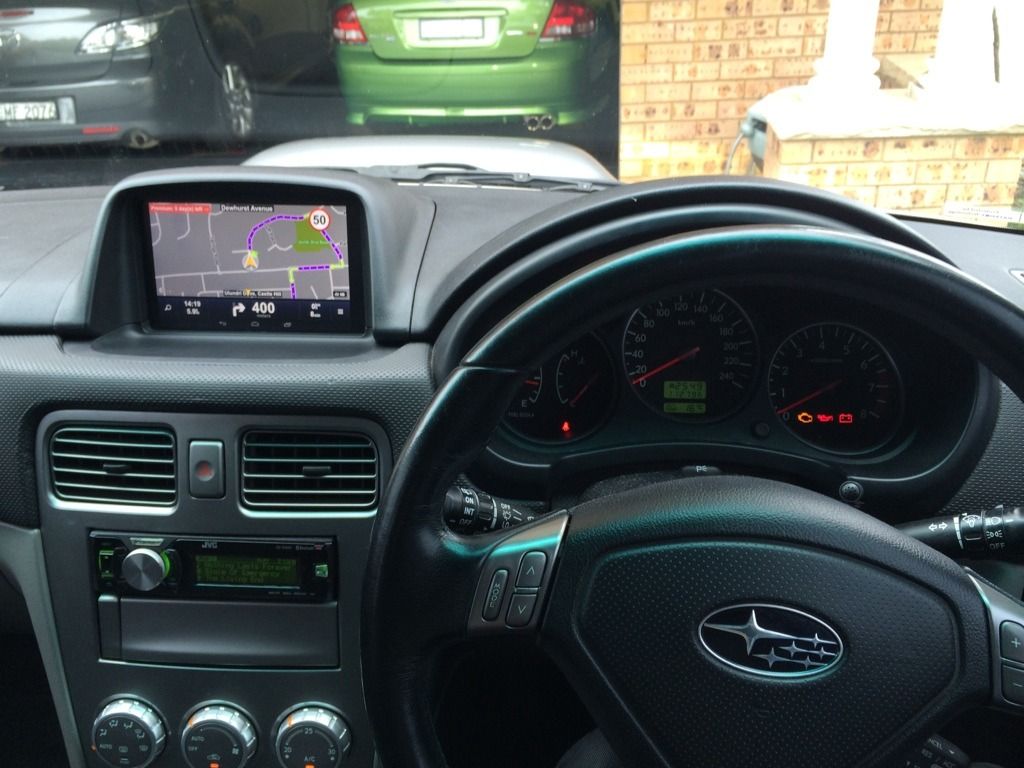
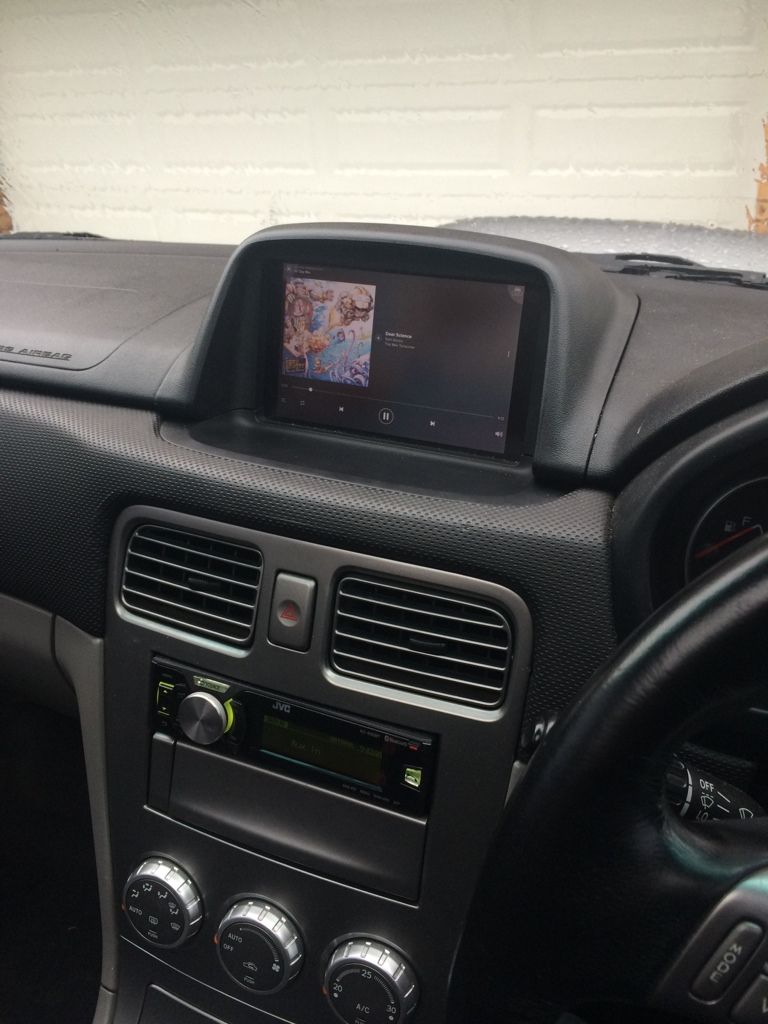
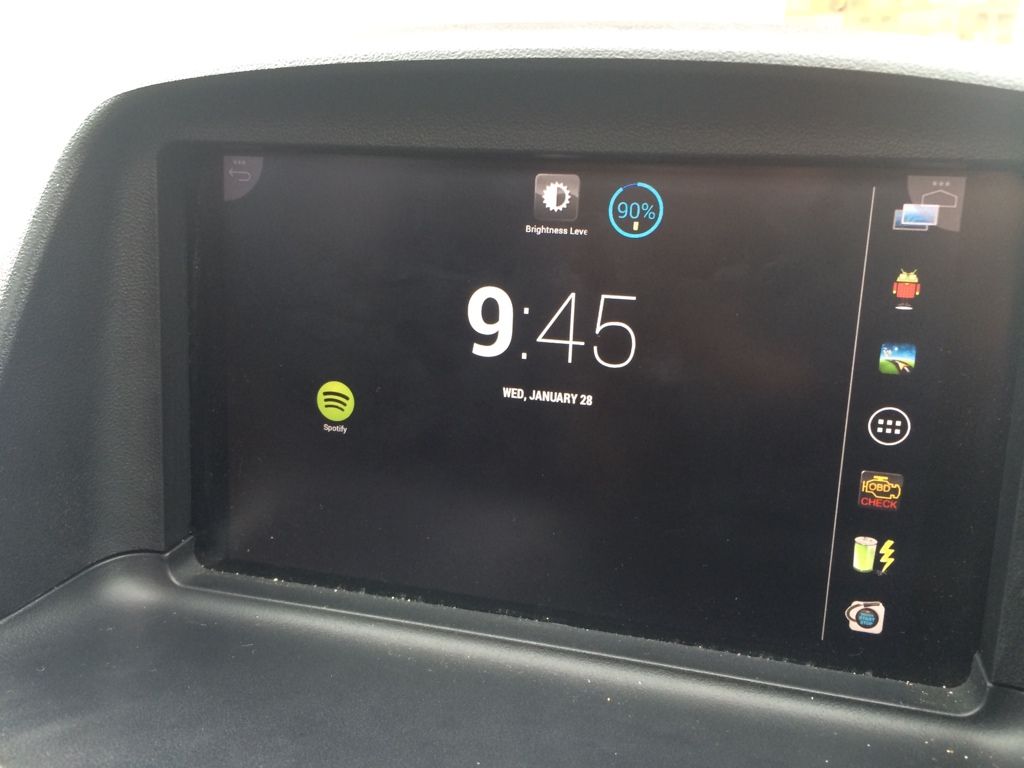
Here is the finished product!


Tools Required:
1) Trim Removal Tools
2) Phillips Head Screwdriver
3) Soldering Iron (or Crimping Tool)
4) Side Cutters
5) Power Drill
Parts Needed:
1) Subaru OEM Double Din Gauge Pod Housing:
https://www.subarugenuineparts.com/...ct_info.php?cPath=22_69&products_id=856&osCsid=1e75c04af2e530bf87d0f23e9d842dfa
2) Asus Nexus 7 (2012 version)
https://play.google.com/store/devices/details/Nexus_7_2012_16GB?id=nexus_7_16gb&hl=en
3) 2.1amp Car Charger (I used this one because it was the one that allowed the phone to charge at its full rate)
In-Car Quick Charger for Smart Phones and Tablets (Micro-B) | MP3/iPod Accessories | MP3/iPod Accessories | Sight & Sound Personal | PRODUCTS | MB3669 | Jaycar Electronics
4) In-Line Cigarette Lighter Socket
CIGARETTE LIGHTER INLine Socket | Automotive | Plugs, Sockets & Adaptors | Interconnect | PRODUCTS | PS2003 | Jaycar Electronics
5) Belkin Mix-It Flat Aux Cable (I used this cable because it allows the aux cable to fit without fouling the dash pod housing)
MIXIT? Aux Cable
6) Mini USB ELM327 Bluetooth Adaptor (You need this if you want to run Torque Pro, I chose the mini adapter because it sits in the OBDII socket flush with the dash, so you can't see it or bump it with your knee whilst you are driving). Similar to in this Link.
2015 Mini Auto CAR ELM327 OBD2 Odbii Bluetooth CAN Scanner Tool Torque Android | eBay
7) Aftermarket Head Deck with Rear Aux or Bluetooth Audio inputs (this is an optional extra for if you want to play music. I like to use Spotify on my tablet). I am using a JVC KDR-90BT Single Din Head unit.
http://www.ryda.com.au/JVC-KD-R90BT-Car-CD-Tuner-p/kdr90bt.htm
8) Matte Finish (Anti-Glare) Screen Protector (This will make the tablet look more OEM when the car is off, it also will make it easier to read in sunlight).
9) Hardshell Case (any will do, even this tacky napoleon case)
http://www.ebay.com.au/itm/Napoleon-Bonaparte-Hardshell-Case-for-Google-Nexus-7-/231014926220
Software Needed
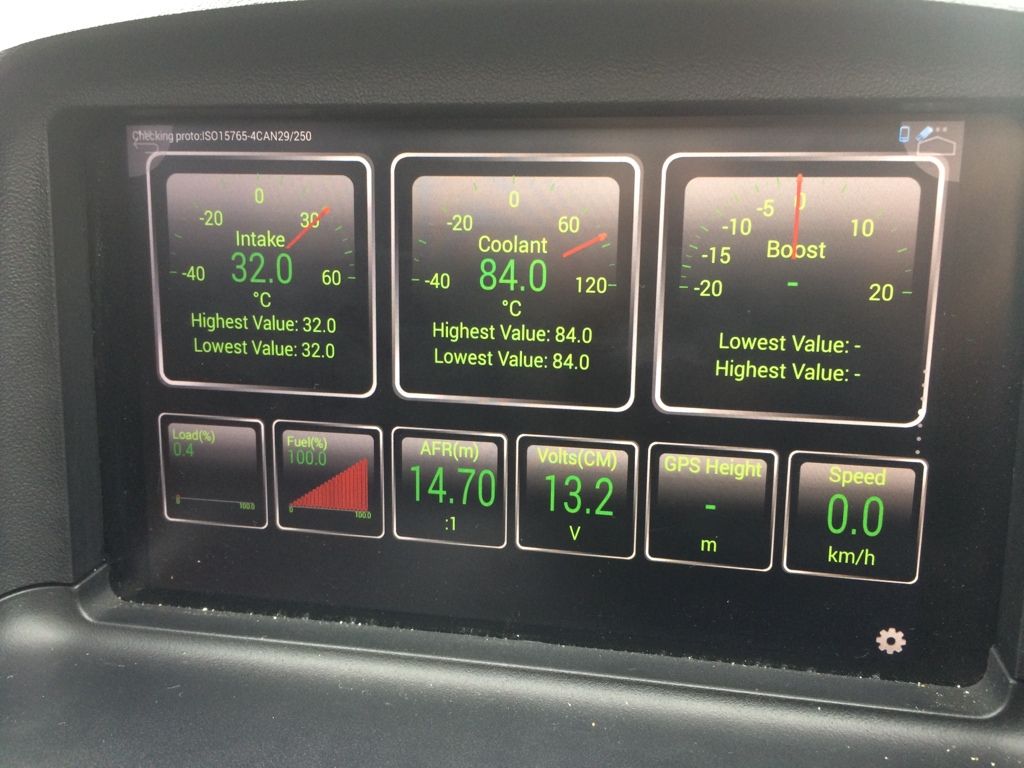
1) Torque Pro for Android
https://play.google.com/store/apps/details?id=org.prowl.torque
2) Torque Theme Pack (You want this so that you can change the colour of your torque dials to match the rest of the dash so that it isn't distracting when you drive
https://play.google.com/store/apps/details?id=com.rey.torquethemes3
3) Condi (You want this so that you can put the tablet into a low power state when the car is turned on or off. It also allows you to set brightness settings for nightime driving and turn on apps (like Torque pro) when the car is started.
https://play.google.com/store/apps/details?id=il.co.kix.minitasker
4) AutoSleeper (This is an app designed for Tablet in car uses. This is the key to making the car install work, putting the tablet to sleep/waking it up when the 12v power is turned off/on)
https://play.google.com/store/apps/details?id=com.as.powerchecker
5) Sygic (This is by far the best Navigation app that I have found. It is good because it works offline and includes speed cameras and red light cameras and comes with free map updates. The only problem with it is that it is expensive. Try it out first, it comes with a free trial)
https://play.google.com/store/apps/details?id=com.sygic.aura
6) Fullscreen (This app lets you change the GUI so that it doesn't obviously look like an android device in your dash. This means more screen real estate for gauges and it makes it look more like an OEM satnav unit. Maybe I am just OCD)
https://play.google.com/store/apps/details?id=de.tsorn.FullScreen
The Install
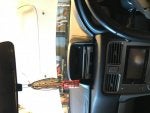
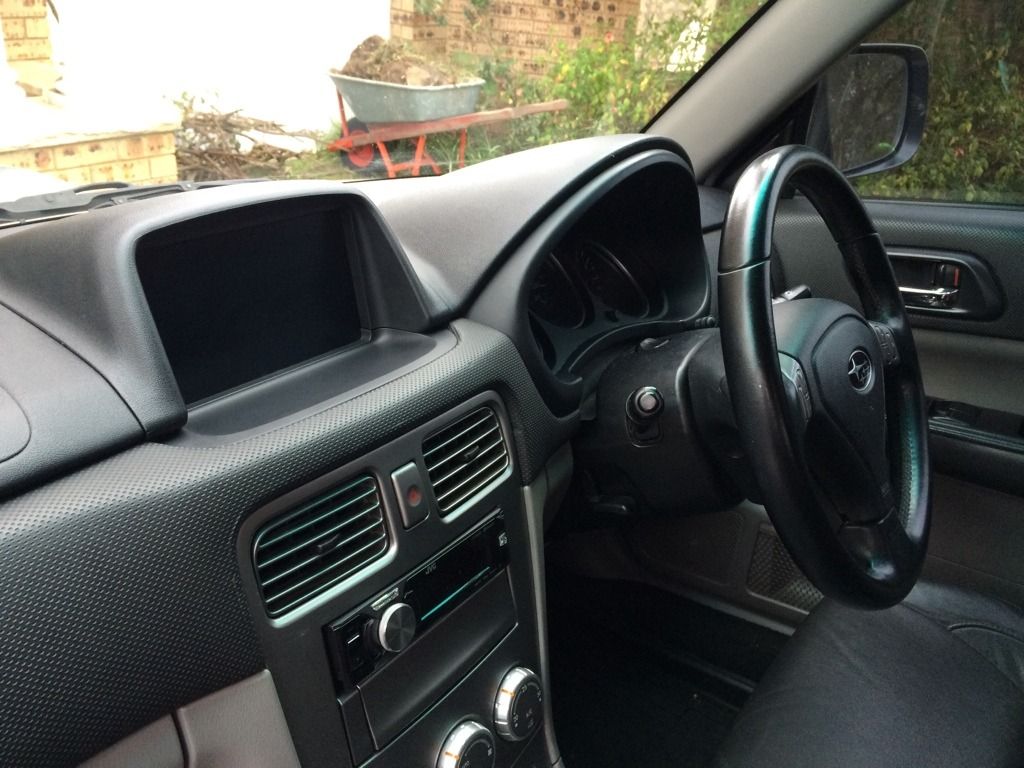
Step 1: Remove Dashtop Storage Cubby
If you pull this cubby forward, it should just come out (There are no screws for this section, it may just need a little force to come out). Once the pod is our, unplug the clock and put the cubby aside.
Step 2: Remove Lower Section of Centre Console (this video will show how to do this really well):
Step 3: Install all of the mounting hardware for the dash pod.
To do this step, follow the instructions provided with the dash pod)
Step 4: Create the Nexus 7 Mount
Drill a few holes in the back of the Nexus 7 Hardshell adaptor, and cable tie the case to the clock adaptor provided with the dash pod.

Align the bottom of the dash pod with the bottom corners of the tablet.
You may need to drill new screw holes to get the alignment perfect.
Step 5: Creating Additional Power for the Tablet
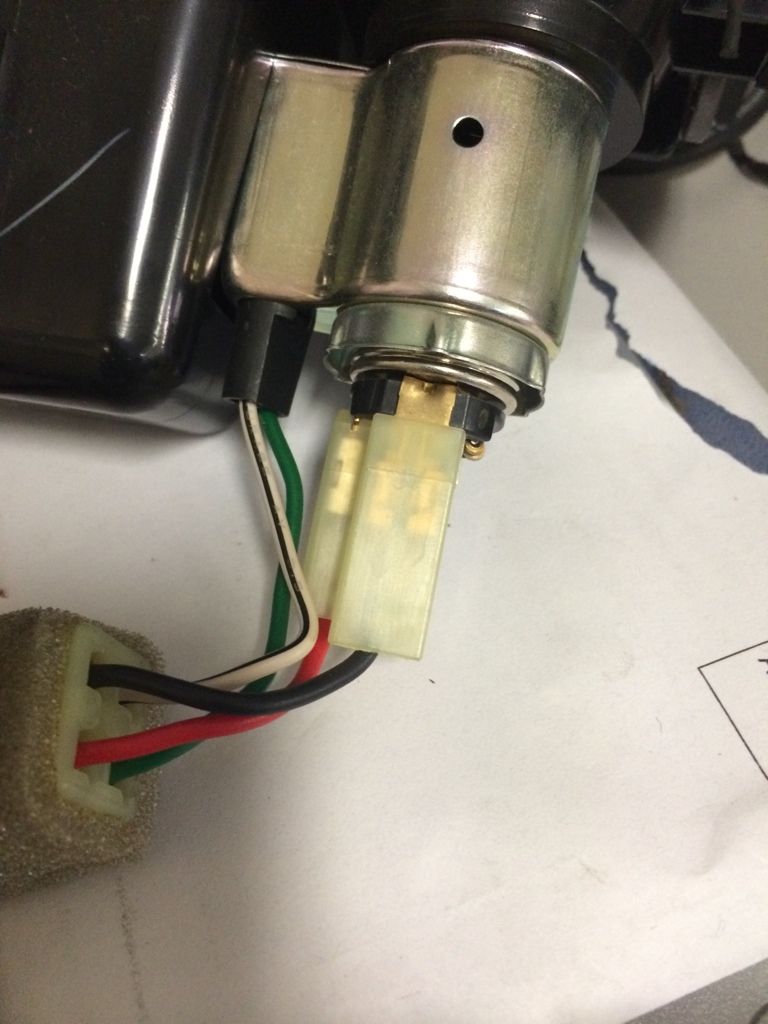
Remove the plugs connected to the back of the Cigarette Lighter plug. Once this loom is disconnected from the car, solder (or crimp) a wire in line with the red wire (+) and the black wire (-) and connect these wires to the positive and negative of the additional cigarette lighter plug you have purchased. If soldering make sure you use electrical tape/heatshrink to protect the connection from shorting out on anything. (NOTE: FROM MODEL TO MODEL, THESE COLOURS MAY BE DIFFERENT - CHECK BEFORE YOU CUT OR SOLDER).
Once this step is completed, plug the USB charger into the new Cigarette lighter plug, reconnect all cables and check the charger is working correctly.
Step 6: Running wires to the tablet
Tape both the MicroUSB cable and the AUX cable to the end of a coathanger and feed it up the left hand side of the centre console. There should be a clear run up this side of the dash. Connect these cables to the tablet (the respective plugs).
Step 7: Test Connections and Put lower console back together.
Test that the power to the tablet and the AUX cable is working correctly. If this is all good. Put the lower centre console back together.
Step 8: The Software
Install Autosleeper (link at beginning of thread) to the tablet. This will allow the tablet to turn on and off with the car. Set the timer on the app around 3-5 seconds (this will give you enough time to keep the tablet on when the car is turned off).
Install Torque Pro - While you are doing this, plug the ELM327 Bluetooth adaptor into the OBD port (below the steering wheel).
Install Condi - In this app create the following macro.
(12v off) - Turn on airplane mode, turn off bluetooth, close torque pro.
(12v on) - Turn off airplane mode, turn on bluetooth, open torque pro.
Step 9: Put cover on dash pod.
Pretty self explanatory. The first time you put it on, it may require a little bit of force to put it on.
Step 10: Enjoy your car with it's Snazzy new Tablet Install!
![Image]()
![Image]()
![Image]()
If you have any questions, ask away!
Here is a how to write up for the Nexus 7 that I modded into the dash top pod of my SG9 Forester.
While I was doing this mod to my car, I found very little documentation and since installing the tablet I have had quite a few people ask me how I did it.
I have been running this in my car for around 5 months now with no real issues (the only possible problem is that it can turn itself off if you park the car in direct sunlight on +35c days, I solved this issue by getting a sun shade - a good idea anyway if you are parking your car in the sun).
This mod may differ slightly for USDM models.
IF YOU DO THIS MOD, IT IS AT YOUR OWN RISK I DO NOT HOLD RESPONSIBILITY FOR ANY DAMAGE DONE TO YOUR CAR OR YOURSELF AS A RESULT OF FOLLOWING THIS DIY
Here is the finished product!

Tools Required:
1) Trim Removal Tools
2) Phillips Head Screwdriver
3) Soldering Iron (or Crimping Tool)
4) Side Cutters
5) Power Drill
Parts Needed:
1) Subaru OEM Double Din Gauge Pod Housing:
https://www.subarugenuineparts.com/...ct_info.php?cPath=22_69&products_id=856&osCsid=1e75c04af2e530bf87d0f23e9d842dfa
2) Asus Nexus 7 (2012 version)
https://play.google.com/store/devices/details/Nexus_7_2012_16GB?id=nexus_7_16gb&hl=en
3) 2.1amp Car Charger (I used this one because it was the one that allowed the phone to charge at its full rate)
In-Car Quick Charger for Smart Phones and Tablets (Micro-B) | MP3/iPod Accessories | MP3/iPod Accessories | Sight & Sound Personal | PRODUCTS | MB3669 | Jaycar Electronics
4) In-Line Cigarette Lighter Socket
CIGARETTE LIGHTER INLine Socket | Automotive | Plugs, Sockets & Adaptors | Interconnect | PRODUCTS | PS2003 | Jaycar Electronics
5) Belkin Mix-It Flat Aux Cable (I used this cable because it allows the aux cable to fit without fouling the dash pod housing)
MIXIT? Aux Cable
6) Mini USB ELM327 Bluetooth Adaptor (You need this if you want to run Torque Pro, I chose the mini adapter because it sits in the OBDII socket flush with the dash, so you can't see it or bump it with your knee whilst you are driving). Similar to in this Link.
2015 Mini Auto CAR ELM327 OBD2 Odbii Bluetooth CAN Scanner Tool Torque Android | eBay
7) Aftermarket Head Deck with Rear Aux or Bluetooth Audio inputs (this is an optional extra for if you want to play music. I like to use Spotify on my tablet). I am using a JVC KDR-90BT Single Din Head unit.
http://www.ryda.com.au/JVC-KD-R90BT-Car-CD-Tuner-p/kdr90bt.htm
8) Matte Finish (Anti-Glare) Screen Protector (This will make the tablet look more OEM when the car is off, it also will make it easier to read in sunlight).
9) Hardshell Case (any will do, even this tacky napoleon case)
http://www.ebay.com.au/itm/Napoleon-Bonaparte-Hardshell-Case-for-Google-Nexus-7-/231014926220
Software Needed
1) Torque Pro for Android
https://play.google.com/store/apps/details?id=org.prowl.torque
2) Torque Theme Pack (You want this so that you can change the colour of your torque dials to match the rest of the dash so that it isn't distracting when you drive
https://play.google.com/store/apps/details?id=com.rey.torquethemes3
3) Condi (You want this so that you can put the tablet into a low power state when the car is turned on or off. It also allows you to set brightness settings for nightime driving and turn on apps (like Torque pro) when the car is started.
https://play.google.com/store/apps/details?id=il.co.kix.minitasker
4) AutoSleeper (This is an app designed for Tablet in car uses. This is the key to making the car install work, putting the tablet to sleep/waking it up when the 12v power is turned off/on)
https://play.google.com/store/apps/details?id=com.as.powerchecker
5) Sygic (This is by far the best Navigation app that I have found. It is good because it works offline and includes speed cameras and red light cameras and comes with free map updates. The only problem with it is that it is expensive. Try it out first, it comes with a free trial)
https://play.google.com/store/apps/details?id=com.sygic.aura
6) Fullscreen (This app lets you change the GUI so that it doesn't obviously look like an android device in your dash. This means more screen real estate for gauges and it makes it look more like an OEM satnav unit. Maybe I am just OCD)
https://play.google.com/store/apps/details?id=de.tsorn.FullScreen
The Install
Step 1: Remove Dashtop Storage Cubby
If you pull this cubby forward, it should just come out (There are no screws for this section, it may just need a little force to come out). Once the pod is our, unplug the clock and put the cubby aside.
Step 2: Remove Lower Section of Centre Console (this video will show how to do this really well):
Step 3: Install all of the mounting hardware for the dash pod.
To do this step, follow the instructions provided with the dash pod)
Step 4: Create the Nexus 7 Mount
Drill a few holes in the back of the Nexus 7 Hardshell adaptor, and cable tie the case to the clock adaptor provided with the dash pod.

Align the bottom of the dash pod with the bottom corners of the tablet.

You may need to drill new screw holes to get the alignment perfect.
Step 5: Creating Additional Power for the Tablet

Remove the plugs connected to the back of the Cigarette Lighter plug. Once this loom is disconnected from the car, solder (or crimp) a wire in line with the red wire (+) and the black wire (-) and connect these wires to the positive and negative of the additional cigarette lighter plug you have purchased. If soldering make sure you use electrical tape/heatshrink to protect the connection from shorting out on anything. (NOTE: FROM MODEL TO MODEL, THESE COLOURS MAY BE DIFFERENT - CHECK BEFORE YOU CUT OR SOLDER).
Once this step is completed, plug the USB charger into the new Cigarette lighter plug, reconnect all cables and check the charger is working correctly.
Step 6: Running wires to the tablet
Tape both the MicroUSB cable and the AUX cable to the end of a coathanger and feed it up the left hand side of the centre console. There should be a clear run up this side of the dash. Connect these cables to the tablet (the respective plugs).
Step 7: Test Connections and Put lower console back together.
Test that the power to the tablet and the AUX cable is working correctly. If this is all good. Put the lower centre console back together.
Step 8: The Software
Install Autosleeper (link at beginning of thread) to the tablet. This will allow the tablet to turn on and off with the car. Set the timer on the app around 3-5 seconds (this will give you enough time to keep the tablet on when the car is turned off).
Install Torque Pro - While you are doing this, plug the ELM327 Bluetooth adaptor into the OBD port (below the steering wheel).
Install Condi - In this app create the following macro.
(12v off) - Turn on airplane mode, turn off bluetooth, close torque pro.
(12v on) - Turn off airplane mode, turn on bluetooth, open torque pro.
Step 9: Put cover on dash pod.
Pretty self explanatory. The first time you put it on, it may require a little bit of force to put it on.
Step 10: Enjoy your car with it's Snazzy new Tablet Install!


If you have any questions, ask away!