Subaru Forester Owners Forum banner
  • The "Garage" feature is for images of YOUR VEHICLE/S only - no blanks or other unrelated images please, thanks

How badly did I mess up? (timing belt content) - Updated!

10K views 12 replies 5 participants last post by  Greenmtnblues  
#1 ·
I'm in the middle of replacing the timing belt and I'm pretty sure I messed up big time.

I posted a few weeks ago about how the harmonic balancer slipped its rubber middle layer, migrated toward the engine and dug a nice gash into the timing belt cover. Crankshaft Pulley -- normal or not?

I was on the fence about repairing it vs. selling/donating or sending it to the junk yard, but a few days ago, I made up my mind to DIY repair.

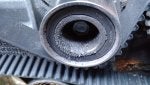
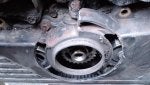
Now, I'm no mechanic by any stretch, but I recently got some air tools and I watched a lot of Youtube videos of people making the timing belt replacement look easy, so yesterday I started my disassembly. Got the radiator and fans out easy peasy, and pulled off the timing belt covers. No apparent damage to the belt from the crankshaft pulley, but there sure was a lot of metal dust on the pulleys (see photos). All great so far. I call it a day, and order the TB kit, new TB cover, etc.

Today, I do a little more work. I put a 22 mm socket on a breaker bar and start turning the crankshaft bolt, just to see how the timing marks line up, and all is good. Then I start taking off the cogs, pulleys, TB tensioner, TB and water pump. All goes smoothly.

Then, being a complete dumb@ss, I thoughtlessly continue to turn the crankshaft. At some point, the driver's side cam shaft spins as I'm doing this (remember now, there's no timing belt on the engine.) A light goes on in my dim brain and I think, "hmmm, I wonder if I broke something." Eventually, it dawns on me that I may have cause the pistons to collide with the valves on the driver's side, causing them to force the left cam shaft to spin.

I realized that I did something dopey, and return the crankshaft timing mark to 12:00 (meaning the pistons are all safely in the middle of the cylinders), then I try to turn the cams to their proper marks. Lo and behold, the driver side cam moves like expected -- resistance, then release, then resistance again as the timing mark reaches 12:00. Not so lucky on the passenger side though. As I try to turn the right cam shaft, tension builds, but then as the timing mark approaches 12:00, tension releases and it sails right past. There is about 15-20 degrees of play in the camshaft. Meaning, I can turn the cam pulley by hand with no resistance at all approx. 15-20 degrees. The timing mark can be placed at 12:00 in this "resistance free zone," but something is telling me this ain't the way it's supposed to feel.

So, what is going on with the passenger side crankshaft. Is the play in the cam normal, or did I mess up my valves? I'm thinking that before I go any further, I should do a compression test to see if the valves are seating properly. Any idea or advice will be greatly appreciated.

GMB
 

Attachments

#2 · (Edited)
Unless I'm missing something here, you're okay - other than being understandably nervous. That low-resistance zone in the cam's rotation is simply the point at which none of the cam lobes are in contact with the rockers and all the valves are closed. Go ahead and finish the belt installation. Then rotate the crank by hand through a bunch of cycles to make sure everything's right. Then you can do a compression test - again, by hand - with all the plugs out so you don't make it harder than necessary. It won't take long for you to figure out which part of the rotation is the compression stroke, and you can get a representative reading if you really swing the breaker bar fast. One pass and you should know where you stand. Oh - and squirt a little oil into the cylinders when you're doing the test.

Why did the cam spin? One of two reasons: Either you bumped a valve or you didn't. When you're timing the motor, the (passenger/right/starboard) cam sprocket timing mark should be at 12:00. If it isn't, you've got valve springs pushing back against the cam lobes and trying to rotate the cam home, and it only takes the slightest nudge for them to succeed. It's possible that you bumped a piston into one of them, but if you're just turning things by hand you don't have the power or speed behind it to do any damage. So relax.

A couple of important points: Make sure you're clear on which of the crank sprocket marks you should be looking at. Of the flags that signal the crank position sensor, the one with the line stamped in it is the one that should be at 12:00. Do not be confused by the triangle stamped in the front of the sprocket - ignore it. And if you're re-installing an old belt that the timing marks have worn off of (vs. a new one with readable marks), you should count teeth to make sure you've got it right - but the books tend to screw this information up. Here's a recent post that will clarify:

timing belt tooth count? - SOLVED!

I just went through this a few days ago while replacing the motor in my '02, which was a slightly more complicated situation.

Let us know how it goes.

[Edit]

I just took a look at your other post, and yeah, that crank pulley made a mess. Obviously you have to do a serious cleanup in there, and be very certain where all that metal came from. Was it from the portion of the pulley that ground through the cover and came in contact with the idler pulleys? If so, you should be okay, as all of those parts are presumably being replaced from the timing kit. As far as sourcing the cover and crank pulley: A good wrecking yard is your best friend.
 
#3 · (Edited)
Outinthewoods -- thanks for taking the time to read my novel, and for posting such a detailed reply.

I think that your ideas of how to approach it from this point make sense. Next weekend, I'll try putting the old parts back on the car and see how it goes when I hand crank it. If I was more confident that there was no damage to the valves I'd just put on the new parts that are on order, but I hate the idea of not being able to return them if I install them and then the car turns out to be dead!

Interestingly, the TB and tensioner were not original to the car. I asked my fiancee whether she had this work done before we met and she had no idea. But she had some old repair records and sure enough, they were replaced. I also noted that the water pump gasket was paper -- not metal like OE -- but I can't find any records to show the WP was changed. One repair shop noted that someone had installed an incorrect thermostat and tried to seal it with Permatex. Sheesh.

I will post again once I get the car back together to let you know how it turns out. Thank you again for sharing your knowledge and advice. I appreciate it :)

GMB

Edit: just noticed your edit...I think the metal dust is just from the worn out bearings. I've seen similar stuff on Youtube videos of TB repairs. Also, the back side of the crankshaft pulley and the idlers did not appear worn from metal on metal contact.

I've cleaned things out with compressed air, and then judiciously used some Brakekleen in places where is won't get into seals...

The TB cover is available for about $50 shipped, and the harmonic balancer for about $65 from Amazon. About $350 all told for the TB kit, new belts, hoses, etc. But of course, the experience is priceless :)
 
#4 ·
Update...

I found time today to get the TB back on the car. Got the marks lined up, put on the belt, checked that the marks on the belt were where they were supposed to be and pulled the "grenade pin."

Used a 3/8" ratchet with a short handle extension to spin the crankshaft bolt, and there were no untoward noises, rubbing, or anything else to make me think something was broken inside.

After two revolutions, the timing marks (the ones on the cam pulleys and crankshaft pulley, not the belt) were no longer exactly perfect at 12:00 (I think things were about one tooth off.) I assume this can be tweaked when I install the new belt...?

Is it possible to tell from this whether I'm in the clear? I don't have a compression tester available today, but can do that part next weekend if needed. Would you proceed to install the new parts at this point? Thanks :)

GMB
 
#5 ·
Update...

I found time today to get the TB back on the car. Got the marks lined up, put on the belt, checked that the marks on the belt were where they were supposed to be and pulled the "grenade pin."
Damn - you got to it before I had a chance to reply (I've been suffering with a screwed-up moon roof all day). My advice would have been not to bother with assembling it with the old trashed parts, but to go ahead and install the new stuff. If the idler bearings are so badly hatched as to spray that much metal around inside the timing cover, they're not going to do you any favours during the installation of the belt.

Used a 3/8" ratchet with a short handle extension to spin the crankshaft bolt, and there were no untoward noises, rubbing, or anything else to make me think something was broken inside.
You would appear to be okay so far, though I use a 1/2" breaker bar so I have better control over the rotation and enough swing to generate higher compression when testing.

After two revolutions, the timing marks (the ones on the cam pulleys and crankshaft pulley, not the belt) were no longer exactly perfect at 12:00 (I think things were about one tooth off.) I assume this can be tweaked when I install the new belt...?

Is it possible to tell from this whether I'm in the clear? I don't have a compression tester available today, but can do that part next weekend if needed. Would you proceed to install the new parts at this point? Thanks
Certainly sounds good to me, so consider this a practice run and go ahead with the new stuff. Repeat the exercise as many times as necessary to get the marks in exactly the right place, and recount teeth to confirm it, as it takes many rotations to get the marks on the new belt to line up again. As you've seen, it's really easy to be out by one. But you won't hurt anything with that little error.
 
Save
#6 ·
Sorry to hear about your moon-roof. Those things can be a real PITA.

I re-assembled with the old parts because the new parts have not arrived yet, and in a moment of panic, I cancelled the order. But, I did want to see what would happen when I manually cranked the engine, so that was my only option at the present time. I will either re-order the parts right away, or see if I can get the compression tested before ordering...

As you say, I did consider this a practice run for the new parts. It was good to do it as an exercise. I noted that the gasket for the rear TB cover on the driver's side is a bit wonky and needs to be finessed into place as the water pump is going in. Also, I need to borrow my friend's torque wrenches for the real install. Is it ok to use Threadlock, especially on the water pump bolts, as they're only torqued to 9 ft.lbs.? Also noted that the belt seemed a little looser on the area after the tensioner, which seems to make sense.

If the timing marks don't line up properly once the new belt is installed, is it standard operating procedure to just re-install till you get it right? I looked at the Auto Zone TB instructions that were in the link you posted. How are you supposed to count 46.8 and 43.7 teeth. Sounds like the best anyone could do would be a rough estimation...

Thanks again for all your help and talking me through this.
 
#7 ·
Sorry to hear about your moon-roof. Those things can be a real PITA.
And how. I'm rehabilitating a car that sat in a junkyard with a blown engine for nine years, so I've got lots of real problems to deal with, and this is the one that's going to be the most time and hassle.

I re-assembled with the old parts because the new parts have not arrived yet, and in a moment of panic, I cancelled the order. But, I did want to see what would happen when I manually cranked the engine, so that was my only option at the present time. I will either re-order the parts right away, or see if I can get the compression tested before ordering...

As you say, I did consider this a practice run for the new parts. It was good to do it as an exercise. I noted that the gasket for the rear TB cover on the driver's side is a bit wonky and needs to be finessed into place as the water pump is going in. Also, I need to borrow my friend's torque wrenches for the real install. Is it ok to use Threadlock, especially on the water pump bolts, as they're only torqued to 9 ft.lbs.? Also noted that the belt seemed a little looser on the area after the tensioner, which seems to make sense.
That question comes up a lot, and it's tempting, but I don't think anyone has ever offered a solid argument for using Loctite where it's not specified. Keep in mind that torque specs normally call for "lightly oiled threads", so as soon as you substitute an anaerobic adhesive you change the equation and will no longer be able to torque accurately.

If the timing marks don't line up properly once the new belt is installed, is it standard operating procedure to just re-install till you get it right? I looked at the Auto Zone TB instructions that were in the link you posted. How are you supposed to count 46.8 and 43.7 teeth. Sounds like the best anyone could do would be a rough estimation...
Yes - get it right. I know that the ".1 tooth resolution" thing is a little goofy; you'll be fine if you round it to the nearest half-tooth. (I assume you're working on an EJ25, so the starboard cam to crank is 47 teeth and crank to port cam is 43.5 teeth.) But if you look really closely you'll see that the sprocket marks aren't centered exactly over either the tooth or the trough, hence the .7 and .8 business.

Thanks again for all your help and talking me through this.
My pleasure - that's why we're here.
 
Save
#8 ·
Countless times I have had the drivers side spin. Not a good idea, but no harm was probably done.

Imo, buy a Subaru belt.
Why? Because it has Mark's on the belt for timing.

Timing 101.

Crankshaft keyway down, timing mark up. Always start your work at this point. This is the zero contact point for the valves. You can safely turn each camshaft 360 at this point.

With the right cam timing mark up, The right side cam shaft will be easy to turn.

The left side balances on a cam lobe.

I have both lower pulleys off, set the belt on the right side, center than left. Using a small pair of vicegrips I lightly pinch the belt in place on the pulley. Around the water pump and install the geared pulley, than the bottom smooth.

With the Mark's i keep checking the position.

Pull the pin. Remove vice grips.

You can start the engine at this time if it's a manual transmission. but dont run it long

Sent from my SAMSUNG-SM-G935A using Tapatalk
 
#9 ·
Just wanted to give you a progress report.

Ordered new TB kit (Aisin -- all Japanese manufactured parts, Mitsubishi TB), new TB cover, new accessory belts (and tensioner pulley, as I discovered the old one was cracked), new crankshaft pulley, new cam seals and crankshaft seal, new Subaru coolant and coolant conditioner, new radiator hoses. No expense spared!

When installing the TB, I noticed that it was significantly tighter than the old one. So much so, that the hydraulic TB tensioner was pushed in so much that the grenade pin was loose. All timing marks lined up perfectly. I rotated the crankshaft a few time to make sure the marks stayed that way, and they did.

Got the TB cover back on, reinstalled accessory belts, the radiator, and coolant. Reconnected the battery, turned the key and...nothing. Dead battery. Jumped the battery, cranked the engine and after about 30 seconds of protest, the engine fired up and ran better and quieter than it's run in years.

The following day I replaced the battery, changed the oil, inflated the tires and took her for a test drive. Again, this car hasn't worked so well in years. No more hesitation when stepping on the gas from a dead stop, and I just can't believe how quiet the engine is!

One remaining question I had: when refilling the coolant, I was only able to get 1.5 gallons into the radiator. I ran the car until it got up to temp in order to get the radiator coolant level to drop, but this never happened. I've watched the temp gauge and the car isn't even close to overheating, and I've repeatedly check the coolant level in the radiator, and it's full. Also, after going for a short drive, both the upper and lower radiator hoses were hot, showing that coolant was flowing through the system. I assume that the system only took 1.5 gallons because there was coolant remaining in the block?

So, I just wanted to say thank you again to outinthewoods and Sackett for the guidance in getting this car back together. This was certainly the most complicated car repair I've done and to have it turn out so well is really satisfying.
 
#10 ·
Assuming your thermostat is not open or leaking, and assuming you did not replace the waterpump or remove the thermostat housing, then you probably never drained all of the coolant in the engine block. Thus, your inability to add as much coolant as suspected.

Also -- it takes seemingly FOREVER for the thermostat to open on an idling vehicle. I resorted to sticking a 2x4 between the seat and console to wedge to gas pedal and get the engine to 3000k. That speeds things up! This is useful if you have a radiator funnel and want to bleed all the air out of the system right away. Or you can just drive it normally and top of the over flow a couple times.
 
Save
#11 ·
Actually, I did replace the water pump. But as you say, I think there remained coolant in the block. I'll keep checking the level to make sure I'm not running low, but so far, so good :)
 
#12 ·
You are fine with the coolant. If you did not replace all the idlers..I would do that. I assume you probably did. If not it should not be a big deal as you know the drill. Congrats on a great job.

I have mentioned this before. Best way to fill coolant: Remove upper hose where it attaches to the radiator. Fill the radiator. Fill the engine through the radiator hose still attached. Attach hose..done, done, and done. No "burping". I cant believe folks don't know this. ;)
 
#13 ·
Yes, all the idlers were replaced. the old ones were covered in fine metal shavings :surprise:

Your method for refilling the block with coolant is genius. I'm going to use this method from now on!
 
You have insufficient privileges to reply here.