
I didn't see a "post" button in the how-to section, so I ended up here. Move as necessary ")
Here’s a brief how-to for installing the GarageXTi hood struts. This is a very simple bolt-on modification, but please keep the following in mind:
- This is a much safer job when if it is made a two-person operation. The reason being is that the hood needs to be propped up without the rod’s help for a portion of the install. While it is possible to hold the hood with one hand and perform the install with the other hand, it is highly recommended to have a friend hold the hood up for you, because let’s face it; you’re not that coordinated. Not only will two people make the install safer, but it will also prevent the somewhat fragile aluminum hood from being dropped and potentially damaged.
![Image]()
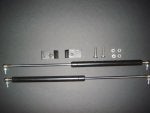
First, make sure your kit is complete. Your kit should have the following
- 2 hood struts with ball joints, sockets and clips pre-installed
- 2 hard anodized aluminum mounting blocks
- 2 button-headed hood bolts
- 2 fender lock washers
- 2 fender washers
![Image]()
Here is a quick picture of the required tools to do this easy install. You’ll need:
- 3/8” or similar ratchet
- 12 mm socket
- 10mm socket
- 5mm Allen wrench
- 11mm open-ended wrench
- OPTIONAL – threadlocker
![Image]()
NOTE: You can start at either end, but it might be easier to begin on the passenger side just in case the prop rod needs to be re-inserted.
First start by taking out the top hood bolt with your 12mm socket. This bolt is pretty stubborn since it seems as though Subaru painted the underside of the hood with the bolt in place.
![Image]()
Next, remove the center fender bolt with the 10mm socket. This bolt might be a little pesky too.
![Image]()
![Image]()
The above two shots show how the threads for both the hood and the fender are countersunk. You can also see (particularly on the fender hole) how the threads can be partially hidden due to misalignment of the fender or hood hinge. It is not uncommon for these items to be misaligned, so make sure that all of the threads are exposed before continuing in order to prevent cross-threading or damaging the bolts’ threads.
![Image]()
Now onto the struts. The struts have pre-greased ball studs that have already been installed. You’ll also notice that a retainer clip has been pre-installed as well. This clip is there as an extra precaution so that the ball stud doesn’t unseat from the socket. The ball stud is locked in place internally with a circlip that is good for about 12 ft/lbs. Technically, the external clips aren’t mandatory, but I recommend leaving them installed.
![Image]()
Now grab the fender washer and lock washer and install them as shown on the PISTON end (not the black shell, the chrome part). NOTE: The piston will face towards the front of the car on both sides of the hood.
![Image]()
Position the strut as shown above, with the body perpendicular to the length of the vehicle. This will make it much easier to screw the ball studs into the fender, and also make it easier to swing the strut in position for mounting it to the hood.
![Image]()
Try to start the ball stud into the fender threads by hand (make sure your two washers are in place). If the ball stud won’t thread in easy by hand, coax it a little with your 11mm wrench, but as always, make sure your are not cross-threading if attempting to start the bolt into the hole with a wrench. You can go ahead and tighten the ball stud until the lock washer is flat. Torque on the stock bolt is only 5.5 ft/lb – I’d give it a grunt and leave it at that.
![Image]()
Now we’ll move up to the hood. Take a look at both aluminum blocks. These blocks ARE DIRECTIONAL, so it’s very important to use the right one for the side that you are working on. Just make sure the threaded hole is towards the OUTSIDE of the car, and you’ll be fine. So, assuming you started with the passenger side, the threaded hole will be facing towards the outside of the fender. You can see the right orientation in the picture above.
NOTE: Using a bit of threadlocker on the Allen head bolt is a good idea.
Take one of the button-head Allen bolts and begin to thread the block into the hood by hand. It should go in pretty easy. If it doesn’t, there’s a good chance that the hood’s threads and the hinge’s hole are misaligned.
![Image]()
As you get close to having the Allen bolt all the way in, start to pay attention to the alignment of the block as it relates to the inside part of the hinge. As you can see in the picture above, the block should sit parallel with the interior part of the hood hinge. Also make sure that the aluminum block’s tang is flush with the leading edge of the hood hinge. This is well-illustrated in the first picture of the block.
Completely tighten the block to the hood with your 5mm Allen key. The factory bolt takes 18.1 ft/lb, which sounds about right for its replacement.
![Image]()
Here comes the only tricky part of the install, and why it’s really best to do with two people.
The hood struts were designed to hold the hood up higher than what the factory prop rod does. This means it won’t help you hold the hood up for this part of the install.
Have a friend stand in front of the car, remove the prop rod and store it, and then extend the hood a few inches higher than standard raised height. Stand on the side of the car near the hood hinge and rotate the strut out from the engine bay and up near the aluminum block (it will rotate freely up toward the hinge fairly easily). Rotate the ball socket assembly so that the threads of the stud are in line with the threads of the aluminum block.
Now you can use your hand on the top of the hood and help your friend find the right height to hold the hood for threading the ball stud into the aluminum block. You want to make sure the alignment between the ball stud and the aluminum block’s thread is close, as this will make it possible to thread the stud almost entirely by hand (small adjustments of the hood height will make this possible). Again, some threadlocker on this ball stud is a decent idea. Removing the safety clip in the ball socket may also help when trying to screw the ball stud in by hand.
![Image]()
Now take the 11mm wrench and completely tighten the ball stud so that it bottoms out on the aluminum block. As you can see from the pic above, getting an 11mm wrench in there is a bit of a tight fit (you can remove the exterior ball socket clip for a bit more clearance). You can also see from these pictures what metal wrenches did to my hood hinge paint from all of the hood strut testing. You may want to wrap your wrenches in tape or take extra care during this step if you don’t want to do a bunch of touch-up work.
![Image]()
A ½ of a grunt is fine here on torque – it’s a small stud in aluminum threads, so you don’t want to go gorilla on it.
Congrats! You are done with one side!
IMPORTANT NOTE: At this point, it’s wise to re-use the prop rod and give your friend a break while you complete the first few steps of the install for the other side. A single strut WAS NOT designed to hold the hood up, so make sure you secure the hood before continuing on (even if it appears that the hood will stay up on it’s own).
Once it is time to attach the struts to the aluminum blocks, have your friend drop the prop rod and hold the hood up again. With the hood fully extended, the ball stud should be pretty close to where it needs to thread into the aluminum block. Once again, work with your friend to get the ball stud and the threads in the aluminum block aligned, and be sure not to take hand pressure off of the hood until the stud is completely bottomed out (this will prevent any chances of the aluminum threads pulling out of the block due to the pressures on it).
Once the ball stud is bottomed out and torqued, you can remove hand pressure from the hood.
Pull the hood down and make sure there are no items binding the free movement of the struts. As with all aluminum hoods, it should be dropped for latching (as opposed to pre-latching it and pressing down on the hood’s surface). You should be able to drop the hood per the manual and it should lock.
There is a chance that some adjustment will be necessary for the hood to reliably latch every time. The test vehicle did not need any type of adjustment, but the factory manual discusses the ability to adjust the hood from the hinges and the front locking mechanism, which may be necessary on your particular vehicle.
![Image]()
Enjoy your proprodless Forester! :Banane02:
Here’s a brief how-to for installing the GarageXTi hood struts. This is a very simple bolt-on modification, but please keep the following in mind:
- This is a much safer job when if it is made a two-person operation. The reason being is that the hood needs to be propped up without the rod’s help for a portion of the install. While it is possible to hold the hood with one hand and perform the install with the other hand, it is highly recommended to have a friend hold the hood up for you, because let’s face it; you’re not that coordinated. Not only will two people make the install safer, but it will also prevent the somewhat fragile aluminum hood from being dropped and potentially damaged.
First, make sure your kit is complete. Your kit should have the following
- 2 hood struts with ball joints, sockets and clips pre-installed
- 2 hard anodized aluminum mounting blocks
- 2 button-headed hood bolts
- 2 fender lock washers
- 2 fender washers
Here is a quick picture of the required tools to do this easy install. You’ll need:
- 3/8” or similar ratchet
- 12 mm socket
- 10mm socket
- 5mm Allen wrench
- 11mm open-ended wrench
- OPTIONAL – threadlocker
NOTE: You can start at either end, but it might be easier to begin on the passenger side just in case the prop rod needs to be re-inserted.
First start by taking out the top hood bolt with your 12mm socket. This bolt is pretty stubborn since it seems as though Subaru painted the underside of the hood with the bolt in place.
Next, remove the center fender bolt with the 10mm socket. This bolt might be a little pesky too.
The above two shots show how the threads for both the hood and the fender are countersunk. You can also see (particularly on the fender hole) how the threads can be partially hidden due to misalignment of the fender or hood hinge. It is not uncommon for these items to be misaligned, so make sure that all of the threads are exposed before continuing in order to prevent cross-threading or damaging the bolts’ threads.
Now onto the struts. The struts have pre-greased ball studs that have already been installed. You’ll also notice that a retainer clip has been pre-installed as well. This clip is there as an extra precaution so that the ball stud doesn’t unseat from the socket. The ball stud is locked in place internally with a circlip that is good for about 12 ft/lbs. Technically, the external clips aren’t mandatory, but I recommend leaving them installed.
Now grab the fender washer and lock washer and install them as shown on the PISTON end (not the black shell, the chrome part). NOTE: The piston will face towards the front of the car on both sides of the hood.
Position the strut as shown above, with the body perpendicular to the length of the vehicle. This will make it much easier to screw the ball studs into the fender, and also make it easier to swing the strut in position for mounting it to the hood.
Try to start the ball stud into the fender threads by hand (make sure your two washers are in place). If the ball stud won’t thread in easy by hand, coax it a little with your 11mm wrench, but as always, make sure your are not cross-threading if attempting to start the bolt into the hole with a wrench. You can go ahead and tighten the ball stud until the lock washer is flat. Torque on the stock bolt is only 5.5 ft/lb – I’d give it a grunt and leave it at that.
Now we’ll move up to the hood. Take a look at both aluminum blocks. These blocks ARE DIRECTIONAL, so it’s very important to use the right one for the side that you are working on. Just make sure the threaded hole is towards the OUTSIDE of the car, and you’ll be fine. So, assuming you started with the passenger side, the threaded hole will be facing towards the outside of the fender. You can see the right orientation in the picture above.
NOTE: Using a bit of threadlocker on the Allen head bolt is a good idea.
Take one of the button-head Allen bolts and begin to thread the block into the hood by hand. It should go in pretty easy. If it doesn’t, there’s a good chance that the hood’s threads and the hinge’s hole are misaligned.
As you get close to having the Allen bolt all the way in, start to pay attention to the alignment of the block as it relates to the inside part of the hinge. As you can see in the picture above, the block should sit parallel with the interior part of the hood hinge. Also make sure that the aluminum block’s tang is flush with the leading edge of the hood hinge. This is well-illustrated in the first picture of the block.
Completely tighten the block to the hood with your 5mm Allen key. The factory bolt takes 18.1 ft/lb, which sounds about right for its replacement.
Here comes the only tricky part of the install, and why it’s really best to do with two people.
The hood struts were designed to hold the hood up higher than what the factory prop rod does. This means it won’t help you hold the hood up for this part of the install.
Have a friend stand in front of the car, remove the prop rod and store it, and then extend the hood a few inches higher than standard raised height. Stand on the side of the car near the hood hinge and rotate the strut out from the engine bay and up near the aluminum block (it will rotate freely up toward the hinge fairly easily). Rotate the ball socket assembly so that the threads of the stud are in line with the threads of the aluminum block.
Now you can use your hand on the top of the hood and help your friend find the right height to hold the hood for threading the ball stud into the aluminum block. You want to make sure the alignment between the ball stud and the aluminum block’s thread is close, as this will make it possible to thread the stud almost entirely by hand (small adjustments of the hood height will make this possible). Again, some threadlocker on this ball stud is a decent idea. Removing the safety clip in the ball socket may also help when trying to screw the ball stud in by hand.
Now take the 11mm wrench and completely tighten the ball stud so that it bottoms out on the aluminum block. As you can see from the pic above, getting an 11mm wrench in there is a bit of a tight fit (you can remove the exterior ball socket clip for a bit more clearance). You can also see from these pictures what metal wrenches did to my hood hinge paint from all of the hood strut testing. You may want to wrap your wrenches in tape or take extra care during this step if you don’t want to do a bunch of touch-up work.
A ½ of a grunt is fine here on torque – it’s a small stud in aluminum threads, so you don’t want to go gorilla on it.
Congrats! You are done with one side!
IMPORTANT NOTE: At this point, it’s wise to re-use the prop rod and give your friend a break while you complete the first few steps of the install for the other side. A single strut WAS NOT designed to hold the hood up, so make sure you secure the hood before continuing on (even if it appears that the hood will stay up on it’s own).
Once it is time to attach the struts to the aluminum blocks, have your friend drop the prop rod and hold the hood up again. With the hood fully extended, the ball stud should be pretty close to where it needs to thread into the aluminum block. Once again, work with your friend to get the ball stud and the threads in the aluminum block aligned, and be sure not to take hand pressure off of the hood until the stud is completely bottomed out (this will prevent any chances of the aluminum threads pulling out of the block due to the pressures on it).
Once the ball stud is bottomed out and torqued, you can remove hand pressure from the hood.
Pull the hood down and make sure there are no items binding the free movement of the struts. As with all aluminum hoods, it should be dropped for latching (as opposed to pre-latching it and pressing down on the hood’s surface). You should be able to drop the hood per the manual and it should lock.
There is a chance that some adjustment will be necessary for the hood to reliably latch every time. The test vehicle did not need any type of adjustment, but the factory manual discusses the ability to adjust the hood from the hinges and the front locking mechanism, which may be necessary on your particular vehicle.
Enjoy your proprodless Forester! :Banane02: