Subaru Forester Owners Forum banner
  • The "Garage" feature is for images of YOUR VEHICLE/S only - no blanks or other unrelated images please, thanks

2015 - Premium - Code p9071 transfer circuit solenoid high - help or advice? - SOLVED!

2.5K views 22 replies 3 participants last post by  badman9  
#1 ·
Vehicle Details:
2015 Forester premium
Hi everyone. The wife's 2015 Forester (TR580 CVT) has been experiencing some intermittent issues that felt like torque bind between the front and rear axle. Almost as if you'd feel the back end grab and ungrab. Been trying to figure it out for weeks but yesterday dashboard lit up with the classic 4 light combo, AT fluid temp blinking light, hill descent control, vehicle dynamic control and abs.

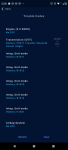
I was able to read the code with a Bluetooth reader and active obd and got a p9071 transfer circuit solenoid high. Had to drive about 3 miles to a friend's shop where I could get the vehicle level, vehicle drove fine even with the warning lights on, but I drove it very gently just to be safe.

I figured couldn't hurt to check the CVT fluid level. Waited for it to cool down and I THINK it was down about one third or half quart or so. Was level last time we did the fluid change.

Anyway topped up, put back on the fill plug, pulled battery to attempt to clear the code/lights. Lights came back on the second restart after that, but then went away and haven't come back since (3 or 4 restarts later). I need to drive the car a bit today to see if it comes back or if the symptoms can be replicated.

Did a lot of reading last night re the fairly common issues people have with the solenoids on the valve body with these. In addition to that went through the TSB that went through the diagnostic and going through the transition control module harness resistances etc.

My question is this. If the warning lights stay off, how drivable is the car? Is a total failure of that solenoid a total show stopper? Will it leave us stranded on the road or will it just be a limp mode? Is this a situation where I need to bite the bullet and order a valve body to Jamaica ($$$$$$$$$) before the solenoid fails?

What's been your experiences?

PS. Been seven starts (and one short drive and two medium drives) now since the codes and I can't get it to reoccur (yet). The car still has that torque bind / skipping feeling at the rear occasionally

Thanks
 
#23 ·
Hope this helps someone in future - Guide to testing and changing solenoid on a TR580 CVT

--------------
DISASSEMBLY

Intake (remove hose as well)

Throttle body (and use something to stuff it) 6 ft lbs aka 72 inch lbs

Pitch stopper mount – throttle body side 14mm headed bolt and nut

Firewall side should be the same – remove dog bone

Remove the ground wire on the drivers side of the valve body

Remove the two pigtail connectors and move them out of the way

Disconnect vent hose from pitch stop bracket

Remove pitch stop bracket from trans (ratchet and wrench)

Remove felt / material cover – uses two 10mm bols , one on top one on side (drivers side)

Remove 10mm holding the harness bracket , remove grey connector from bracket –

Tuck the red harness down by the starter

Remove the passenger side grounding wire and stick the bolt back into the position – may need it for the purpose of prying the cover upward

Spray brake parts cleaner all over the top of the vbalve body cover, vacuum it as well (or use air hose if possible to blow it off)

Remove top cover, uses twelve 10mm bolts holding top cover on – note the 3 alignment dowels

Disconnect internal wiring harness

Remove old gasket and be careful especially in the rear section

Do diagnostics using Subaru guide from the internal harness. – see diamgrams below


To remove valve body, remove 7 black bolts plus the silver with 10 and silver with 10 (two silvers) – refererence diagrams

Lift up the valve body, vertical then forward – put rag or some means to catch the cvt fluid

With old valve body out, wipe up around the gasket face using microfibre

Remove the two o rings carefully


--- VALVE BODY FIX

Remove the ground on the harness clip side of the valve body

Bend the hiring harness retaining clip backwards

Image


Image


Remove all 10mm bolts on back side with main solenoid bank to remove the retaining plate / bracket

Be careful of the ground wire

Image


Longer bolts x 2 use nuts on the other side use a capture nut on reverse side

Image


Image


Tightening sequence for retaining bracket 7 ft lbs or 80inch lbs – middle and then outside corss, outside cross

7ft lbs for solenoid retaining bracket and bolts

6-7 ft lbs for valve body bolts


Check ohm readings on the connector before putting valve body back into the vehicle


REINSTALLATION


REPLACEMENT / REASSY

Replace with two new o rings, lube up with a little bit of cvt fluid – make sure they seat

Put valve body in place. Temporarily tighten the two silver bolts

Then do 7 black bolts – run down by hand

Tighten from inside one outward to 9nm - 80 inch lbs or 6.6ft lbs

Then torque two silver bolts to 9nm as well

Take brake parts cleaner on a rag and wipe down sealing surface on cvt case

Put new gasket down on the alignment dowels

The ovals cut out of gasket (in the middle) – ultra grey or black , put some silicone

Clean the pan (upper cover) sealing surface

Plug valve body connector back in first and then put the cover back in place

Set it straight down on alignment dowels and do twelve 10mm bolts by hand – THEN torque to 8nm aka 5 ft lbs aka 70 inch lbs aka 5.8 ft lbs

Pull back up harness bracket from starter, hook grey connector back onto bracket, tighten harness bracket back down in place,

Reinstall the small ground wire from passenger side (left hand side)

Reinstall fire blanket/insulation blanket with two 10mm bolts

Plug in connectors

Reinstall pitch stopper mount

Hook up vent tube to mount

Hook up main ground (right hand side)

Hook up pitch stopper dogbone

Replace throttle body – use NEW gasket 7ft lbs or 88 inch lbs


Image


Image


Image

Image


Image

Image


Image


Image
 
#22 ·
The ground issue is from removing the actual retaining bracket on the valve body that holds the solenoids in place. That is the difficult one.

Re the relearn, figured I would test drive first and see how it feels. The dealer can do the relearn but they are inconveniently located, and charge about 200us for the service. My main mech has a two way scan tool (fancy Launch) so i guess I can get it done there or with a friend who has an advanced autel if needed.

Re the broken ground, exact same thing happened to this guy in the same position

 
#20 ·
Thanks for the help earlier. This is probably the most advanced mechanical job I've done solo tbh so it gives me encouragement. Also cleaned the throttle body while I was in there but it wasn't bad because I did it about 40,000km ago.

Next jobs
Change coolant
CVT and diff drain and fills (last one was about 50,000km ago)
Spark plugs (last done about 50,000km ago)
 
#18 ·
Just wanted to o give you guys an update

Just an update. Pulled out the valve body yesterday and changed the bad solenoid and put everything back together. Just done some very small test drives so far, and no errors as yet. New solenoid resistance as measured both at the solenoid and the harness was within spec. Old solenoid resistance ie voltage was way way above spec.

Will keep monitoring over the next few days.

Wasn't an easy job at all, took me the entire day, but that's how things go first time. Put everything back using a torque wrench as well so I know nothing was damaged.

Hardest part was removing the bolts that hold the solenoid retaining plate on the valve body itself. For something with such a low torque figure for reassembly they were absurdly tight. As I was warned by a video on youtube, one of the valve body solenoid grounds would break while removing the bolt. I was as careful as I could be and yes it happened. Had to go to a friend to crimp and solder on a new ground mid job which set me back two hours or so.

Still need to do a drain and fill (X2) when I get chance but couldn't do that at home since nowhere flat to set the level. I just topped up approx what I lost.

Hopefully this generic solenoid holds up, but if I have to do it ever again, I know what I'm doing so it will be faster.

May consider doing the entire valve body if it ever happens again but we will see. Genuine valve body in Jamaica is $1500 USD though. Oof

I attached a small video I took for my friend to show him the issue after the ground broke for reference


Image
 
#17 ·
Will have to find out how or when I can do the relearn. I mean I can ask the dealer but they are traditionally useless here tbf

Other thing to work out is whether I am going to take on the solenoid change Job myself. Will definitely want the help of a friend or two. If somehow it doesn't work out/aftermarket solenoid causes issues as well, at least I know the (very expensive) valve body option exists.

Thanks for all the help so far. I'll still use some contact cleaner on the connector and recheck the resistance before I tear everything down, but really need the wife's car fully functional again. She works about 50km from home and we are currently renting a vehicle for her which gets real expensive real fast
 
#15 ·
Thanks. Thats what I was thinking indeed.

I also checked some of the other positions such as the torque converter lockup etc just to see if their resistances were within the reference spec (they were).

Seems like the AWD/transfer solenoid really is the offending party. Next step for me is to strategise how and when am I removing the valve body to change the solenoid. I'll also do a drain and fill or two on the fluid while I'm there.

I wonder if I'll need to initiate a re-learn procedure after, which would mean accessing a more expensive communication tool than I currently have. Also will need to get my hands on a quarter inch torque wrench. Definitely don't want to be over torquing those sensitive bolts
 
#13 ·
Hi guys, just checking if I understand correctly. Is the transfer/AWD lockup solenoid this (arrow) position on the transmission side connector? It's the middle male pin on the firewall side of the grey connector.

If so, I'm getting resistance readings of 20 ohms and up, but need to confirm that I'm testing the right one to begin with
 
#11 ·
issues with related systems like the brake pedal/light switch potentially causing the error cascade
@badman9

No, not related to brake pedal switch at all. I suppose it is possible and you would definitely want to eliminate any other circuit concerns before concluding the solenoid inside the valve body is the problem. ALL the solenoids receive power from the TCM and ground internally inside the CVT assembly.
 
#9 ·
On the older cars, voltage is applied to the solenoid to disengage the AWD feature. That's why you put a fuse in. With the circuit deenergized, the car operated in the AWD mode but without control features (on/off) enabled. Does your owner's manual offer guidance on this matter?
 
#8 ·
The wife has been asking me this and I have no answer for her. Thinking about it, if it fails and throws an error code which, the TCM should in theory default to FWD mode? Is that still a thing on these modern vehicles like how you could have done it with a fuse on the older ones? If so, no worries at all. If it fails where it locks the rear in then we may have a problem.
 
#12 ·

Thanks for that, provides some clarity on how the system works.

So just to be clear that i understand it, by default the solenoid is in the not energised position, ie normally vented. This causes it to SEND power to the rear axle.

When the solenoid becomes energised, it allows CVTF to flow to the hydraulic component, ie the clutch pack which causes it to DECOUPLE from the rear, ie. goes into "front wheel drive" or more front bias mode.

So if the AWD/transfer solenoid was to be having an issue where its reading high (high voltage and likely high resistance due to the proportional relationship between those) it implies that it isnt being sufficiently energised, and therefore is engaging the rear axle more/when it shouldnt be doing so, which can explain the "tight corner braking phenomenon" similar to when you take really tight turns in a four wheel drive with the centre differential locked.

If im understanding this correctly, a "high" solenoid failure is greater risk of damage than a "low" solenoid failure (which would in theory just lock the solenoid into FWD mode)
 
#4 ·
More than likely the AWD solenoid is starting to have issues. Up to you if you want to address it now or in the future if the DTC sets again. Circuit High means there is voltage left where there shouldn't be any, indicating possibly an open circuit (usually the solenoid) or more unlikely a power supply short circuit allowing excessive voltage. Don't see a lot of internal wiring harness issues since they're sealed inside the CVT assembly. Wouldn't bother wasting time cleaning connectors trying to chase an issue with an internal valve body solenoid.
 
#5 ·
Thanks for the reply j3rf. Being located in Jamaica, the cost of a new valve body here is in the $1500 usd range from the dealer. I was thinking to go through the electrical diagnostic procedures first just to rule it out before having to splash out that kind of money. I do have a few questions you may be able to help with as a subaru tech

1. From your experience, do you find that failed solenoids will fail the resistance check (with values out of the reference range)
2. Do you have any experience with the aftermarket solenoids? Labour rates are cheap here and me and my friends are probably capable of pulling the valve body and changing the solenoid ourselves, so was considering this route first before biting the bullet on an entire new valve body for 1 solenoid.
3. What symptoms would you typically see with such a failure?

Thank you
 
#3 ·
Thanks for the reply. Im not overly worried about the other codes, those are from so far back, i assume from when a battery had a total failure (0.0V) so those are stored.

Main concern is the transfer control solenoid high code, which came back again this morning but self cleared at the next restart. Seems to be more likely to occur when cold/first start and is fine later on.

Regarding the cleaning of the connectors it is a good idea, I also need to test the continuity/resistance of the harnesses and connectors and see if I can get a reading from the solenoid in question via the harness connector rather than having to pull down the entire valve body.

See the details from the service manual/diagnostics below.

My worry is what happens if the solenoid itself fails (either open or closed). Is there a risk of damage or does "limp mode" with the 4 warning lights on the dash disable all wheel drive entirely?
 
#2 ·
"P0971" I don't have the reference manuals for this new of a car. This code is not saying, "This is broken." It's saying something looks weird here. So you have a high voltage beings sensed by the computers. It's not unusual for a coded fault to arrive and clear itself after some driving. If one like this keeps coming back, you will definitely need to deal with it. At this point, I would disconnect and clean all the associated wiring connector with an spay can of electronics cleaner.

An explanation of the dashboard lights is the transmission temp light is a summary alarm indicating a problem in the transmission. The other three lights indicate those systems have been disabled by the computer.

If you get the code again, I recommend you get the freeze frame data.

I think the rest of those codes are related to the battery disconnect. It's just a guess on my part, though. Better to reset through the code reader unless you need a full "reset".
 
You have insufficient privileges to reply here.