Subaru Forester Owners Forum banner
  • The "Garage" feature is for images of YOUR VEHICLE/S only - no blanks or other unrelated images please, thanks

2004 XT - How to wire JDM power folding mirrors

30K views 34 replies 11 participants last post by  piffington12  
#1 ·
This will be short and sweet. I acquired my mirrors about two months ago and finally got around to starting this project.

You will need tools, duh. Go get some electrical tape, soldering iron if you prefer that way. I soldered. A small straight pick and enough wire to span door to door.

Try this at your own risk. I'm not responsible for any damage due to you giving this a shot! :)

You will need a set like this, it's what I used and know how to wire.

The switch is included with all the other window buttons, the switch will be taken out of the JDM control pod thingy.

Next, you will notice that the pigtails on the JDM mirrors are cut. You need to remove these two pins and repin your stock harness in your door. No picture but the wires I'm referring to are blk/white and solid yellow.

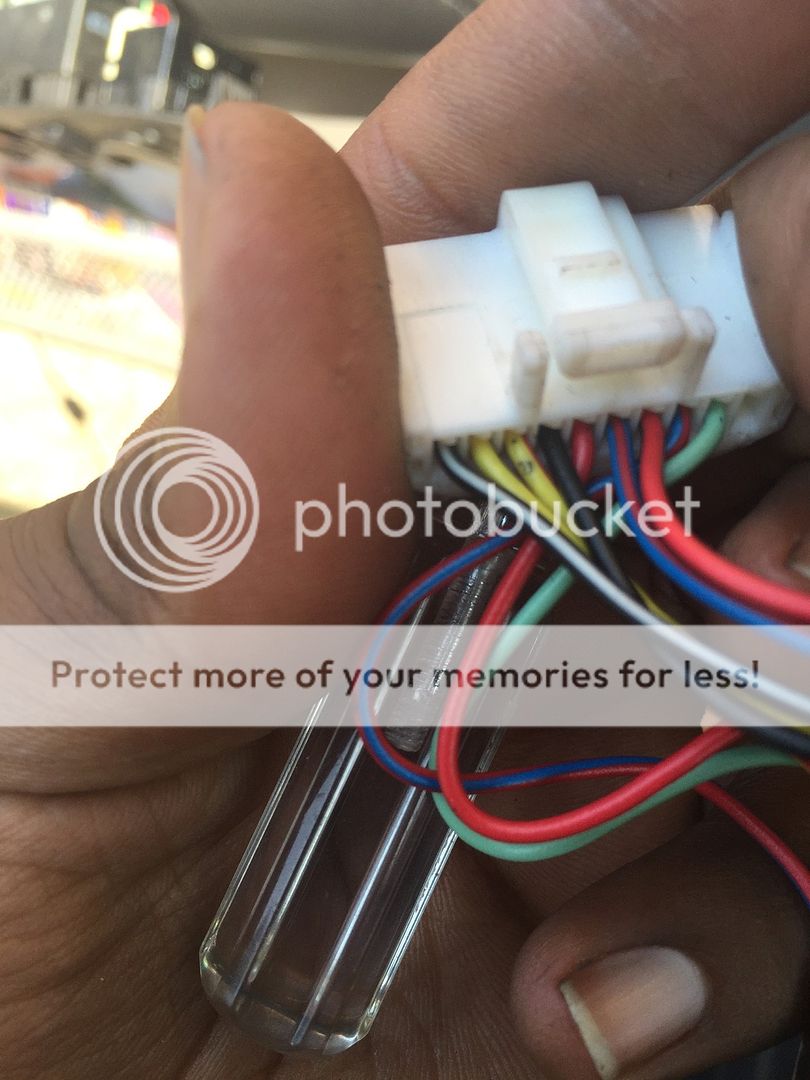
Next, unplug the harness to the switch that controls the mirrors on the JDM control pod thingy :) compare to your stock harness and you'll see the JDM harness has two extra wires. Remove those two extra pins and repin your stock harness. These wires are also blk/white and solid yellow. See pic below.

 
Save
#2 · (Edited)
So, the next step is removing the mirror control switches from both main control pods. From here, I added a length of wire for power and ground from the newly pinned door harness all the way to the passenger side. Basically connecting both female harnesses. I took the time to solder and run the wires through the loom in the door jamb, under the carpet and dash, under carpet again and back through the passenger door jamb.

 
Save
#3 · (Edited)
At this point, I did the same thing I did on the driver side. Repin the harness from your door to replicate the JDM harness that came with the mirrors. Connect the wires you just ran with the two new pins on your harness.

Install passenger mirror and button up your door panel.
Go back to your driver side and tap into your power and ground wire and splice the two wires you pinned into the mirror control/fold harness. This will now suppl power and ground to both mirrors. See what I did there? Made it easy!
 
Save
#4 ·
The last thing is to retro fit the folding switch into your usdm main control pod. *****DO NOT USE THE JDM CONTROL POD*****

I took a drill bit, made a pilot hole and quickly made it bigger. Slow down and don't ruin it, it'll be your fault.

 
Save
#5 ·
Below you will see the usdm and JDM bezels.


Make yours look like the JDM pod!
I used a dremel to achieve that.
Here's the end result below.

 
Save
#6 ·
Button up your door panel, test everything first obviously then call your fellow forester friend and say booyah!!!! That's what I did. Kinda. Shoulda seen his face when he pressed the button :)
 
Save
#7 · (Edited)
Obviously, there was some prep work before the install happened. I swapped in some usdm bugeye glass since the JDM glass is made for rhd cars and will screw up your view. I was able to retain my heated function, happy about that. You may or may not be so lucky. I might have to swap my stock tirangles after shaving some material off, I will update after that is done.
See ya!
 
Save
#12 ·
Is it possible to keep the USDM large mirror housing and just swap over the moving/folding parts? I like having the bigger mirrors and indicators (and heating element), but really want the power folding option....
 
Save
#13 ·
Good question. I'm not sure if that'll work. Only one way to find out. Post back here what you find out if you swap the internals over. I was able to keep the heated function.
 
Save
#14 ·
Haha, will do. I've found a place in Canada that sells the early SG JDM folders, and if all it needs is the motors, I might be able to come up with a working solution.
 
Save
#21 · (Edited)
For future reference, I just compared the internals today, and unfortunately it won’t fit. Even though the USDM glass’ backplate will fit the JDM motor’s pattern, the whole internal mechanism is shifted towards the car on the JDM because they are smaller so the mounting points dont fit in the USDM housing.

The JDM has black heater wires and USDM has yellow heater wires

Image
Image
Image
 
#17 ·
I just picked up a set of these JDM blinker/power folding (i believe) for my SG5. Seems to be the same size as my USDM mirror size. It doesn't seem as though it's manual folding and I will require to wire in the turn signal as well. Commenting to remember this thread and hopefully provide an update sometime soon

Image


They are larger than my 05 LGT set so I'm hopeful :)
 
#19 ·
Exactly. Lol. The mirrors connectors are different. Munkee 04 SG5 has black 6 pin connector while these mirrors have a white 10 pin I believe. Very similar to the LGT. Face life SG5 has them equipped so I gotta were it in somehow. Lol
 
#20 ·
Pictures, fairly simpler than with my legacy gt. The mirror glass got me stumped as the usdm bugeye glass does not fit in the housing properly. Does anyone have any other suggestions of mirror glass that would work?

Sent from my Nexus 6P using Tapatalk
 
#22 ·
Good to know...I didn't like the 03-05 jdm mirrors (too small) and installed 06-08 jdm ones instead since the mirrors were far larger and I wanted the turn signals as well.
 
#23 ·
I finally managed to get a set of heated 05 WRX mirrors (for the glasses). I proceeded to swap the glasses over to my JDM mirrors and it was a success. But.... sad news for me :(

The angle of the mirror housings is too small compared to the USDM mirror which have a more open angle. I need to adjust the mirrors to the outer extreme and I still see my own car in them unless I sit waaaay too close to the steering wheel. I guess they really aren't made for LHD cars :\
 
#24 ·
Oh! After Googling a bit on the subject for other Subaru models, I’ve found that other models require a swap of the base (the part that mounts to the car). I needed to use the screws extractor because 4 out of 6 bottom screws were rusted and broke with a screwdriver. The base of the driver side needed a bit of grinding of the plastic because the metal part is just a bit different. And it only holds by 2 screws as the third one doesn’t line up.

I took everything apart and it worked! I even reinstalled the JDM glass for the driver as it offers better viewing angle (convex mirror)

Here are some photos if you find it interesting ;)

Image


Image


Image


Image
 
#25 ·
Good going! ^^^^^

I forgot to post I got my power folding 06+ blinker mirrors installed on my 04 SG XT. made a small harness to go from mirror to mirror and then wired in the heater and power folding.
 
#26 ·
@iNfEk Nice! Did you have to swap the bases for the kouki mirrors or was it a direct fit? In my case I already had heat so I shopped for heated JDM.

Just to make sure I get it right, I simply need to hook up the 2 extra pins on the switch to the 2 fold wires on both mirrors and thats it? I dont need to source a +12V anywhere else right?
 
#27 ·
@vizi0n No swapping of bases are required. That’s usually Imprezas. LGT and FXT don’t require it. The pin out between the 06+ is a different connector and larger.

You will need to rewire to get it to work.

You also need to get the switch on the door panel. Which is already powered so no additional 12v is required. The switch and modification of LHD window panel is required for the add in button.
 
#28 ·
@iNfEk For my mirrors (JDM 03-05) on my 04 XT I had to swap the base or else I was looking at my car in the mirrors because of the angle. I already have the switch installed but I could not confirm the wiring/pinout changes. I only need to insert 2 male pins on each of the mirror's door connector as they are already a direct fit.
 
#29 ·
@vizi0n Really? Hmm. I got usdm mirrors coming in and if they doesn’t change it then I’ll swap bases. But the large view is nice. Lol. Maybe I’ll give that a go.

So run the extra two wires to the switch and you should be set.
 
#31 ·
@piffington12 You need to heat the glass with a heatgun, pry the plastic around it and pop it off very gently using spatulas or plastic pry tools. It is held by 2 glue strips

Once you got the glass off, you can remove the plastic backplate (it is screwed in the housing/motor)

If your mirrors are heated there will also be 2 wires going to the glass which you need to undo when you got the glass unglued
 
You have insufficient privileges to reply here.